|
Local Templates
Local
Templates
'Space Templates' are preconfigured spaces with furniture and equipment
that are typologically classified to rapidely build up floor plans.
There are two types of Space Templates in Onuma:
- Global Templates which are set up by Onuma. They are
available in the right panel at floor plan level. Onuma is continuously
adding and updating these Global Templates.
- Local Templates are templates that are specific to a
single Onuma Studio. They can be added and modified by the
administrator of a Studio or by an Editor user designated by the
administrator.
In general Studios that don't have an administrator like
'Editor Pro Studio', 'Sandbox Studio', etc. there are no Local
Templates. You may share your scheme privately with other users by
setting up a User Group. The spaces in the shared scheme can then be
used by this User Group similar to templates. Please send an inquiry to
Onuma, Inc. if your group is interested in upgrading to a private Onuma
Studio where you can manage your own local templates.
This help section covers:
Local
Templates Set Up (Studio Admin)
As the Administrator for your Studio Group, you automatically have
access to a User Group titled Template Creator.
You can decide to add more Users to this group or you can just manage
and create the Local Templates on your
own. To learn more on User Groups see HERE.
You also have access to the Local Templates
in a scheme named Studio Specific Space Templates
at the bottom of your project list; this is where new templates for
your studio are created.
Here's how:
- Enter the scheme Studio Specific Space
Templates
- Create a building. Rename the building to reflect the
typological classification of the spaces you intend to add to this
building. The building name is what will be displayed in the pull-down
menu.
- Add a space, being as detailed as the template needs to be
(i.e. adding furniture, space attributes, etc.)
- Now this newly created template will be available for your
studio on the space category pull down menu under Local
Templates

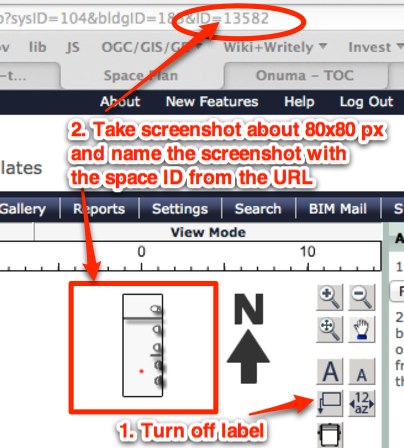
If you want to add the optional thumbnail to your space
templates as in the above example, here is how you would add them:
- Once you finished to size and furnish the template space,
zoom out until the space is approximately 80 x 80 pixels (about the
size of a penny) and take a screen shot
Note: one good free screen shot tool: Gadwin
PrintScreen

- If your screen shot tool allows you to draw a window
around only the room (like Gadwin) you may skip
this step; otherwise, open your screen shot in a photo editing program,
and crop your screen shot down so you only have that thumbnail sized
picture of the space template
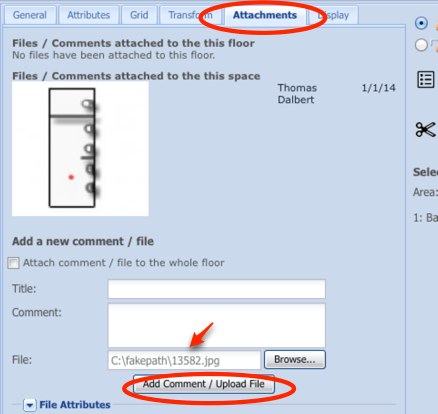
- Save the screen shot as a jpg named after the last set of
ID=# numbers in the address bar of your browser when you are in that
space

- Attach the picture to the space by double-clicking on the space:

back to top
Templates
for Editor Pro Users
Since Editor Pro Users are bundled into the Editor Pro Studio, you may
have noticed that there are a lot of people in your studio, for this
reason we have changed how templates works. For example, a template
that you need may not be something that everyone else in the studio
needs; however, you might be working with 2 or 3 other Editor Pro Users
and for this group you have a need for specific templates.
To do this you need to:
back to top
|

